参考资料(用于学习与核对)
这篇文章记录的是我在 Ascend C 中级认证 Sigmoid 题目上的完整实践过程,包含环境准备、实现要点、常见坑位和可复现代码,方便后来者少走弯路。
环境搭建要求
环境需满足以下条件:
- 设备需具备昇腾 NPU。
- CANN 版本需为
8.0.0.beta1。 - 环境由开发者自行准备。
典型场景举例(若指导文档中的 CANN 版本号与 8.0.0.beta1 不一致,请自行调整):
- 开发者套件(Atlas200I DK A2,或香橙派)部署方式: Atlas 200I DK A2算子开发环境搭建指导-Ascendc中级认证专用.docx
- 华为云 ModelArts Notebook 部署方式: 华为云Ascend C算子开发环境搭建手册(微认证).docx
题目说明
题目要求实现 Ascend C 算子 Sigmoid,算子命名为 SigmoidCustom,需要完成:
- kernel 侧代码。
- host 侧代码。
- aclnn 算子调用测试。
相关算法:
$$ sigmoid(x) = \frac{1}{1 + exp(-x)} $$
具体要求:
- 完成 Sigmoid 算子 kernel 侧核函数相关代码补齐。
- 完成 Sigmoid 算子 host 侧 Tiling 结构体成员变量创建,以及 Tiling 实现函数补齐。
- 支持 Float16 类型输入输出。
代码工程与下载
下载文件:
注意:若选用非开发者套件环境,请自行确认算子工程目录中以下文件配置正确。
CmakePresets.json:确认 CANN 开发包安装路径配置正确。CmakePresets.json:确认soc_version名称与开发环境匹配。op_host/sigmoid_custom.cpp:确认soc_version名称配置与开发环境匹配。
实现流程
4.1 代码补齐
在提供的工程中,SigmoidCustom 目录为算子工程目录。按注释提示补全指定源码文件即可。
4.2 编译构建
代码补齐完成后,在算子工程目录执行:
bash build.sh
命令行显示构建成功信息后,再进入下一步。
4.3 安装算子包
构建成功后,在算子工程目录执行如下命令安装算子包(实际 run 包文件名以编译结果为准):
cd build_out
./custom_opp_ubuntu_aarch64.run
命令行显示安装成功信息后,即可进入测试环节。
4.4 AclNN 调用测试
AclNNInvocation 目录为 Aclnn 单算子 API 调用方式的测试工程目录。在前述步骤完成后进入该目录并执行:
bash run.sh
注意:测试工程中的其它文件不要修改。测试通过后会显示通过信息。
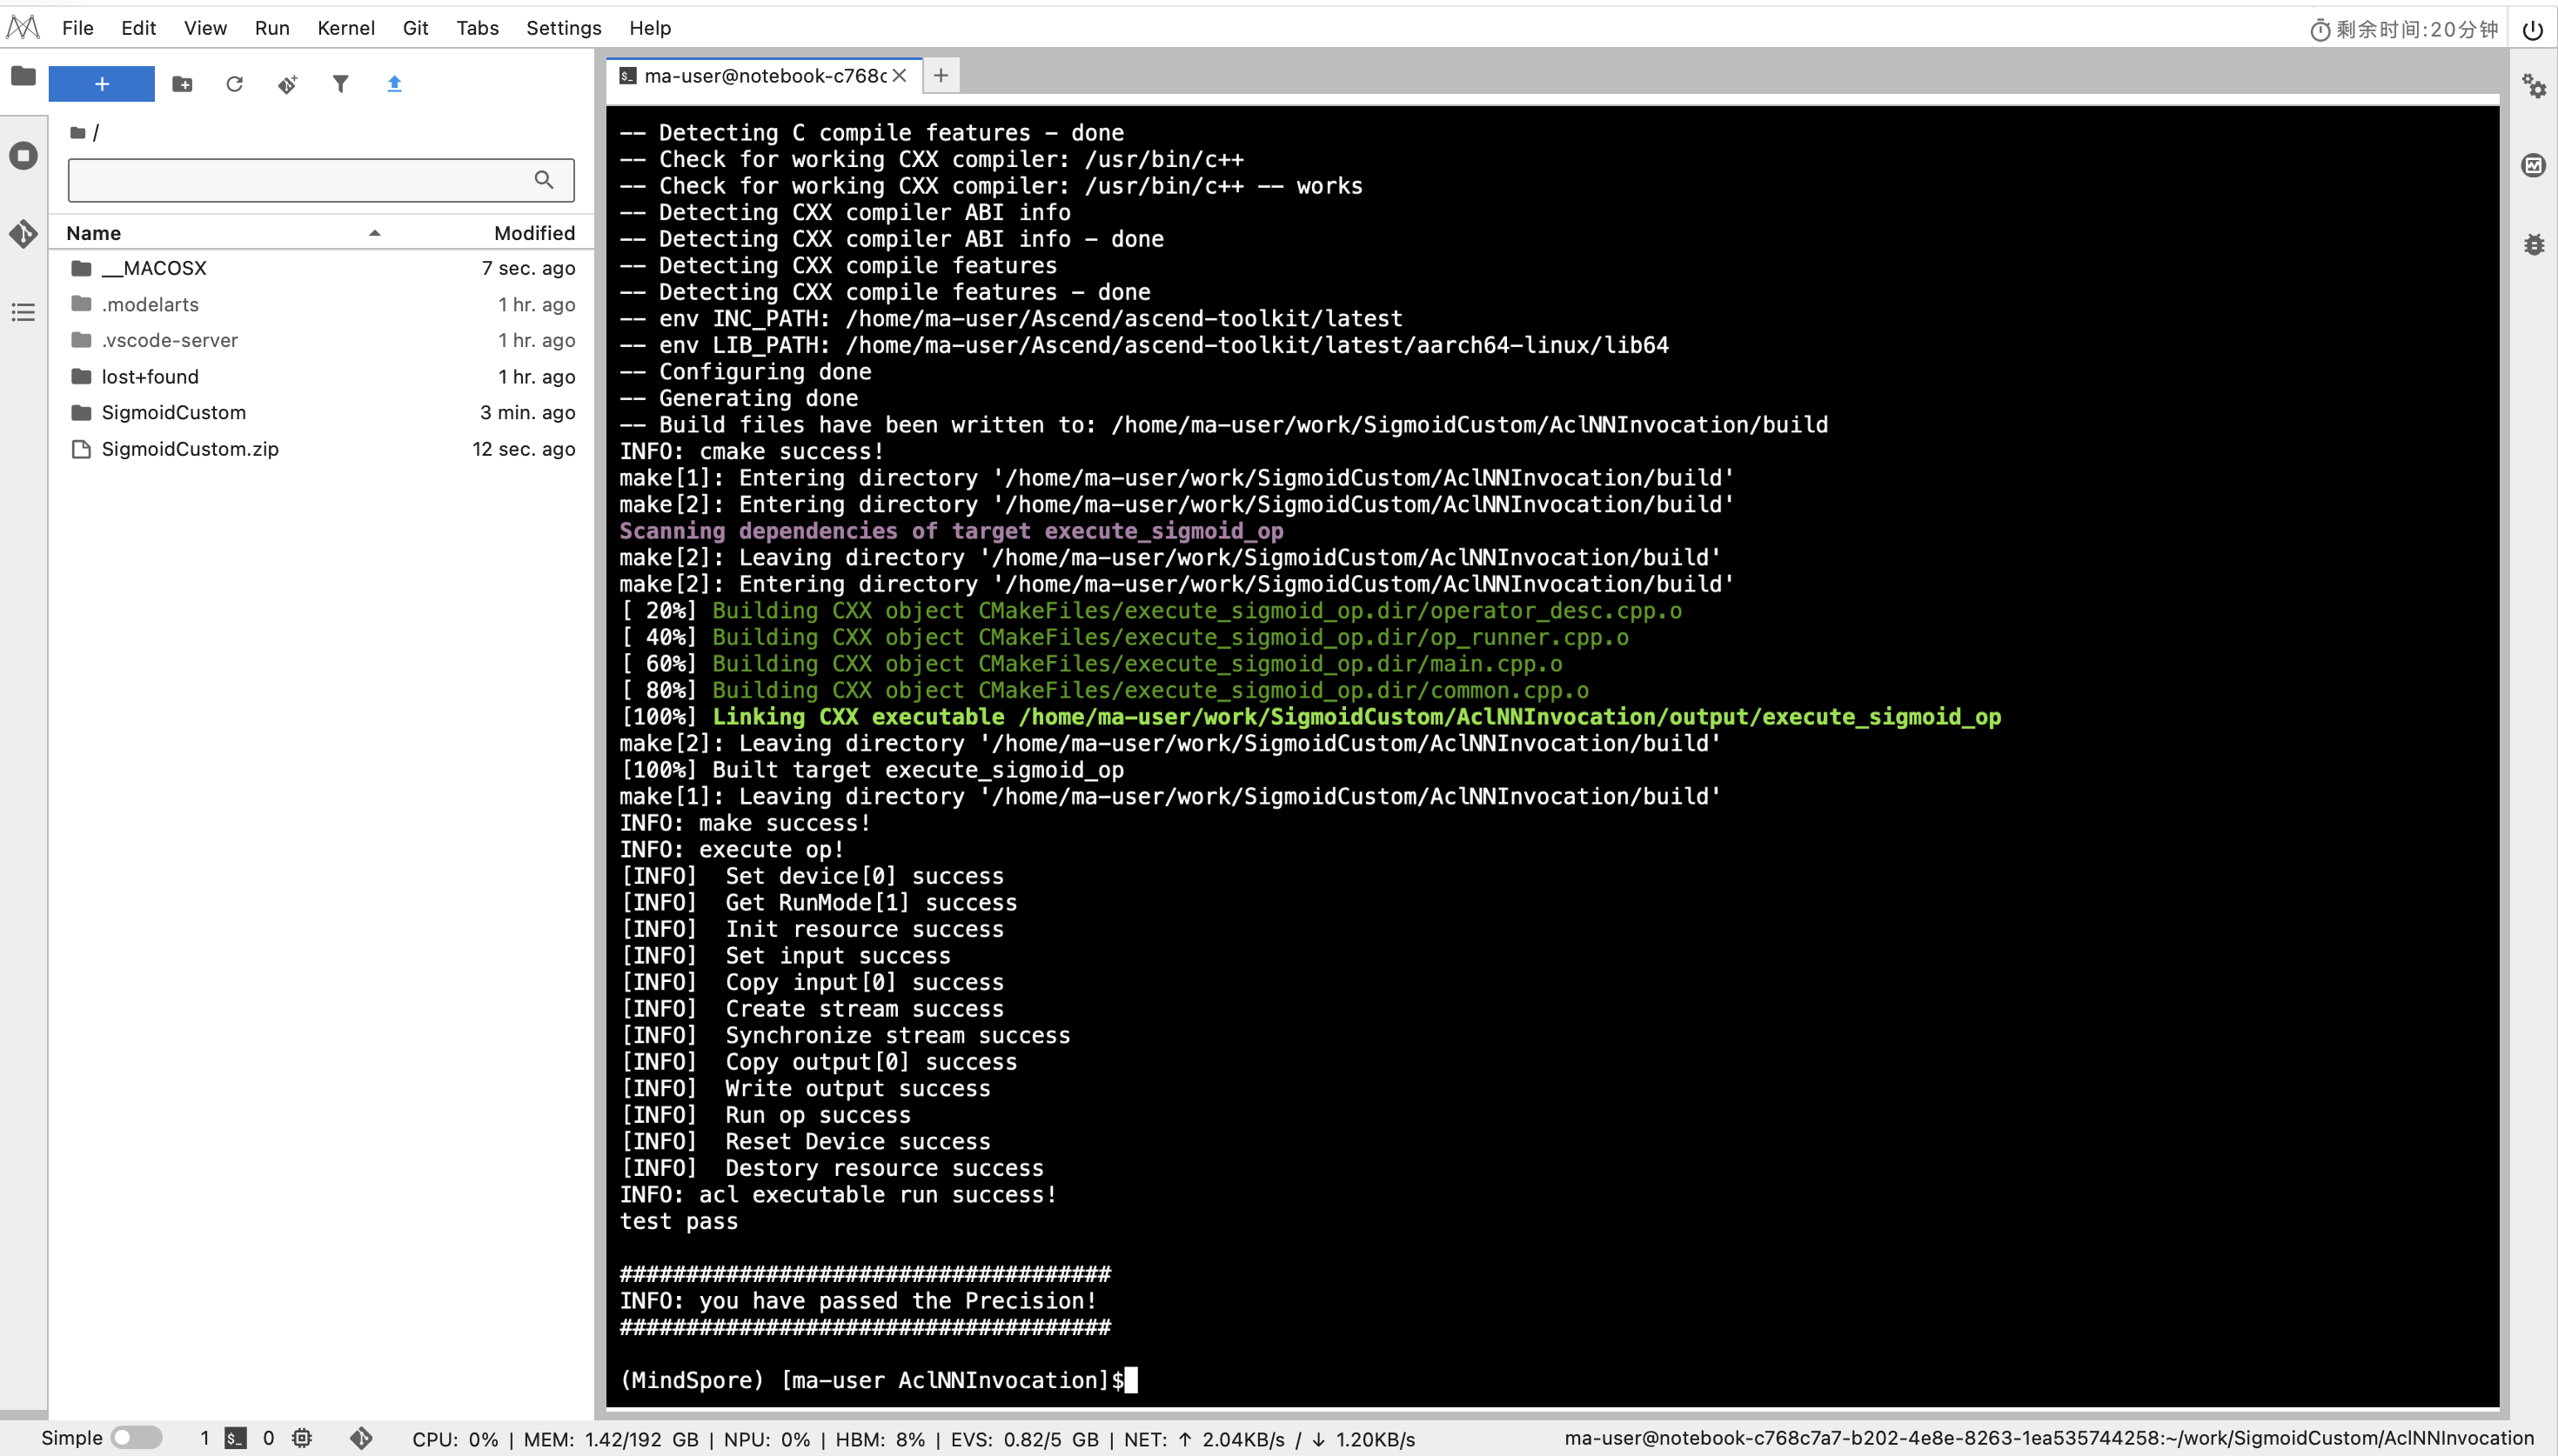
图:bash run.sh 执行后,终端显示 test pass 与精度通过信息。
提交与文件规范(原题要求)
- 完成编程后,将实现工程代码打包为 zip,仅提交
SigmoidCustom目录,不要包含AclNNInvocation目录(例如:SigmoidCustom.zip)。 - 在算子实现工程目录(
SigmoidCustom)中,op_host和op_kernel两个目录不要新增多余文件,仅修改已有的.cpp和.h文件。 - 每次购买该认证共 5 次提交机会,提交前请务必检查完整性与正确性。
示例实现(学习参考)
以下三段代码分别对应不同路径下的文件。内容用于学习和核对思路,建议独立完成后再进行对照。
1) /SigmoidCustom/op_host/sigmoid_custom_tiling.h
#include "register/tilingdata_base.h"

namespace optiling {
BEGIN_TILING_DATA_DEF(SigmoidCustomTilingData)
  //考生自行定义tiling结构体成员变量
  TILING_DATA_FIELD_DEF(uint32_t, totalLength)
  TILING_DATA_FIELD_DEF(uint32_t, tileNum)
END_TILING_DATA_DEF;

REGISTER_TILING_DATA_CLASS(SigmoidCustom, SigmoidCustomTilingData)
}
2) /SigmoidCustom/op_host/sigmoid_custom.cpp
#include "sigmoid_custom_tiling.h"
#include "register/op_def_registry.h"


namespace optiling {
const uint32_t BLOCK_DIM = 8;
const uint32_t TILE_NUM = 8;
static ge::graphStatus TilingFunc(gert::TilingContext* context)
{

  SigmoidCustomTilingData tiling;
  //考生自行填充
  uint32_t totalLength = context->GetInputShape(0)->GetOriginShape().GetShapeSize();
  context->SetBlockDim(BLOCK_DIM);
  tiling.set_totalLength(totalLength);
  tiling.set_tileNum(TILE_NUM);
  tiling.SaveToBuffer(context->GetRawTilingData()->GetData(), context->GetRawTilingData()->GetCapacity());
  context->GetRawTilingData()->SetDataSize(tiling.GetDataSize());
  size_t *currentWorkspace = context->GetWorkspaceSizes(1);
  currentWorkspace[0] = 0;

  return ge::GRAPH_SUCCESS;
}
}

namespace ge {
static ge::graphStatus InferShape(gert::InferShapeContext* context)
{
  const gert::Shape* x1_shape = context->GetInputShape(0);
  gert::Shape* y_shape = context->GetOutputShape(0);
  *y_shape = *x1_shape;
  return GRAPH_SUCCESS;
}
static ge::graphStatus InferDataType(gert::InferDataTypeContext *context)
{
const auto inputDataType = context->GetInputDataType(0);
context->SetOutputDataType(0, inputDataType);
return ge::GRAPH_SUCCESS;
}
}


namespace ops {
class SigmoidCustom : public OpDef {
public:
  explicit SigmoidCustom(const char* name) : OpDef(name)
  {
    this->Input("x")
      .ParamType(REQUIRED)
      .DataType({ge::DT_FLOAT16})
      .Format({ge::FORMAT_ND})
      .UnknownShapeFormat({ge::FORMAT_ND});
    this->Output("y")
      .ParamType(REQUIRED)
      .DataType({ge::DT_FLOAT16})
      .Format({ge::FORMAT_ND})
      .UnknownShapeFormat({ge::FORMAT_ND});

    this->SetInferShape(ge::InferShape).SetInferDataType(ge::InferDataType);

    this->AICore()
      .SetTiling(optiling::TilingFunc);
    this->AICore().AddConfig("ascend910b");
  }
};

OP_ADD(SigmoidCustom);
}
3) /SigmoidCustom/op_kernel/sigmoid_custom.cpp
#include "kernel_operator.h"
using namespace AscendC;
constexpr int32_t BUFFER_NUM = 2;
class KernelSigmoid {
public:
  __aicore__ inline KernelSigmoid() {}
  __aicore__ inline void Init(GM_ADDR x, GM_ADDR y, uint32_t totalLength, uint32_t tileNum)
  {
    //考生补充初始化代码
    ASSERT(GetBlockNum() != 0 && "block dim can not be zero!");
    this->blockLength = totalLength / GetBlockNum();
    this->tileNum = tileNum;
    ASSERT(tileNum != 0 && "tile num can not be zero!");
    this->tileLength = this->blockLength / tileNum / BUFFER_NUM;
    xGm.SetGlobalBuffer((__gm__ half*)x + this->blockLength * GetBlockIdx(),
    this->blockLength);
    yGm.SetGlobalBuffer((__gm__ half*)y + this->blockLength * GetBlockIdx(),
    this->blockLength);
    pipe.InitBuffer(inQueueX, BUFFER_NUM, this->tileLength * sizeof(half));
    pipe.InitBuffer(outQueueY, BUFFER_NUM, this->tileLength * sizeof(half));
    pipe.InitBuffer(tmpBuffer1, this->tileLength * sizeof(half));
    pipe.InitBuffer(tmpBuffer2, this->tileLength * sizeof(half));
    pipe.InitBuffer(tmpBuffer3, this->tileLength * sizeof(half));
    pipe.InitBuffer(tmpBuffer4, this->tileLength * sizeof(half));
  }
  __aicore__ inline void Process()
  {
    //考生补充对“loopCount”的定义,注意对Tiling的处理
    int32_t loopCount = this->blockLength / this->tileLength;
    for (int32_t i = 0; i < loopCount; i++) {
      CopyIn(i);
      Compute(i);
      CopyOut(i);
    }
  }

private:
  __aicore__ inline void HighPrecisionReciprocal(LocalTensor<half>& dst,
                        const LocalTensor<half>& src,
                        int32_t length,
                        int iterations = 2)
  {
    LocalTensor<half> tmp = tmpBuffer4.Get<half>();
    half two = 2.0h,negone=-1.0h;

    // 初始近似值 (可以使用硬件Reciprocal的初始值)
    AscendC::Reciprocal(dst, src, length);

    // 牛顿迭代: x_{n+1} = x_n * (2 - a * x_n)
    for (int i = 0; i < iterations; ++i) {
      AscendC::Mul(tmp, src, dst, length);    // tmp = a * x_n
      AscendC::Muls(tmp, tmp, negone, length);   // tmp = 2 - a * x_n
      AscendC::Adds(tmp, tmp, two, length);
      AscendC::Mul(dst, dst, tmp, length);     // x_{n+1} = x_n * tmp
    }
  }
  __aicore__ inline void CopyIn(int32_t progress)
  {
    //考生补充算子代码
    LocalTensor<half> xLocal = inQueueX.AllocTensor<half>();
    DataCopy(xLocal, xGm[progress * this->tileLength], this->tileLength);
    inQueueX.EnQue(xLocal);
  }
  __aicore__ inline void Compute(int32_t progress)
  {
    //考生补充算子计算代码
    LocalTensor<half> xLocal = inQueueX.DeQue<half>();
    LocalTensor<half> yLocal = outQueueY.AllocTensor<half>();

    LocalTensor<half> tmp1 = tmpBuffer1.Get<half>();
    LocalTensor<half> tmp2 = tmpBuffer2.Get<half>();
    LocalTensor<half> tmp3 = tmpBuffer3.Get<half>();

    half one=1.0,negone=-1.0;
    AscendC::Muls(tmp1, xLocal, negone, this->tileLength);
    AscendC::Exp(tmp2, tmp1, this->tileLength);
    AscendC::Adds(tmp3, tmp2, one, this->tileLength);
    // AscendC::Reciprocal(yLocal, tmp3, this->tileLength);
    HighPrecisionReciprocal(yLocal, tmp3, this->tileLength, 2);

    outQueueY.EnQue<half>(yLocal);
    inQueueX.FreeTensor(xLocal);
  }
  __aicore__ inline void CopyOut(int32_t progress)
  {
    //考生补充算子代码
    LocalTensor<half> yLocal = outQueueY.DeQue<half>();
    DataCopy(yGm[progress * this->tileLength], yLocal, this->tileLength);
    outQueueY.FreeTensor(yLocal);
  }

private:
  TPipe pipe;
  //create queue for input, in this case depth is equal to buffer num
  TQue<QuePosition::VECIN, BUFFER_NUM> inQueueX;
  //create queue for output, in this case depth is equal to buffer num
  TQue<QuePosition::VECOUT, BUFFER_NUM> outQueueY;
  GlobalTensor<half> xGm;
  GlobalTensor<half> yGm;

  //考生补充自定义成员变量
  TBuf<QuePosition::VECCALC> tmpBuffer1, tmpBuffer2, tmpBuffer3, tmpBuffer4;
  uint32_t blockLength;
  uint32_t tileNum;
  uint32_t tileLength;
};
extern "C" __global__ __aicore__ void sigmoid_custom(GM_ADDR x, GM_ADDR y, GM_ADDR workspace, GM_ADDR tiling) {
  GET_TILING_DATA(tiling_data, tiling);
  KernelSigmoid op;
  //补充init和process函数调用内容
  op.Init(x, y, tiling_data.totalLength, tiling_data.tileNum);
  op.Process();
}
重点坑位解析:Reciprocal 精度误差导致测试失败
这个测试题最容易翻车的点,不在框架注册,也不在 Tiling,而是在 Sigmoid 最后一步倒数计算。
Sigmoid 的核心是:
$$ sigmoid(x)=\frac{1}{1+e^{-x}} $$
当你把分母记为 $d=1+e^{-x}$ 后,最后一步就是算 $1/d$。很多同学会直接用硬件倒数指令(Reciprocal),但它通常是“快速近似值”,在 Float16 下误差可能被放大,最终在测试脚本的精度阈值校验中超限。
为什么会错
- Reciprocal 常见实现是近似初值,不保证直接达到严格误差要求。
- 当前算子全链路是 Float16,尾数位少,近似误差更容易体现在输出上。
- Sigmoid 输出区间在 $(0,1)$,靠近边界时对误差更敏感,批量比较时容易出现极值点失败。
方案 A:Reciprocal + 牛顿迭代修正(推荐)
先用 Reciprocal 求一个初值 $y_0$,再做牛顿迭代提升精度:
$$ y_{k+1}=y_k(2-dy_k) $$
你的实现思路就是这个方法。一般做 2 次迭代,精度通常就足够通过这类认证测试,同时比直接高精度除法更快。
工程要点:
- 初值仍然使用 Reciprocal,吞吐高。
- 迭代 1 到 2 次通常够用,2 次更稳。
- 迭代会增加少量 Mul 和 Add 指令,性能与精度要平衡。
方案 B:直接使用 AscendC::Div(更稳但可能更慢)
如果你不想手写迭代,也可以直接用 Div 计算:
$$ y=\frac{1}{d} $$
这条路的特点是实现简单、结果稳定,但在某些场景下吞吐可能不如“Reciprocal + 迭代”。在考试场景里,优先目标是“先过精度”,所以 Div 也是完全可行的保底方案。
如何选择
- 追求通过率和稳定性:优先 Div。
- 追求性能并兼顾精度:Reciprocal + 2 次牛顿迭代。
- 时间紧张时:先用 Div 保证通过,再替换成迭代版本做性能优化。
建议的自测方式
- 重点覆盖大正数、大负数和接近 0 的输入。
- 对比 CPU 侧高精度结果,检查最大绝对误差和平均误差。
- 至少做一次全量样本回归,避免只在随机小样本上“看起来能过”。
常见问题与解决
问题:安装算子包时出现权限相关报错
安装算子包阶段出现了权限与路径相关问题,典型报错包括:

图:安装自定义算子包时出现 Permission denied / Operation not permitted 等报错。
Permission deniedOperation not permittedchmod: changing permissions of '/usr/local/Ascend/ascend-toolkit/latest/opp/vendors'- 无法创建
.../opp/vendors/customize/framework
这类问题本质上通常不是算子代码写错,而是环境变量没有先加载,导致安装流程默认写入系统目录(如 /usr/local/Ascend/...),当前用户没有对应权限,所以安装失败。
解决方法
在编译、安装、运行测试前,先执行下面这条命令加载 Ascend 环境:
source /home/ma-user/Ascend/ascend-toolkit/set_env.sh

图:先执行 set_env.sh,再进行构建、安装和测试。
然后重新执行构建和安装步骤(bash build.sh、安装 run 包、bash run.sh)。
建议
每次新开终端都先执行一次 source,再进行算子编译和安装,能避免大多数路径和权限类报错。
结果展示

图:通过 Ascend C 算子开发能力认证(中级)后的证书展示。